Saturday, July 28, 2012

I'm Missing a Letter!

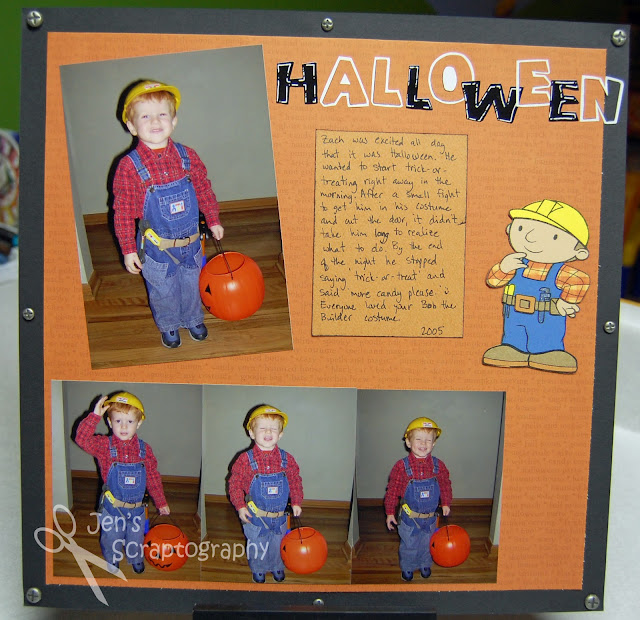
Have you ever started a layout only to find that you don't have enough sticker letters to complete your title?  Or that you can't find the perfect embellishment to go with your page?  This happens less frequently with me now that I have a Cricut but it still happens.   We all have those sticker letters in our stash that we want to use, but once you've used them a time or two it gets harder to form words.  Well, here is a great tip I saw in a magazine (I made this page a few years ago so I don't remember which magazine it was in) that solves the problem. 


Use the left over part of your sticker letters to create your title!  Just cut around them and you have a hollow letter. Of course this will only work if you are using letters that have a white or colored background.  This is so simple I just wish I would have thought of it.   


And what about those hard to find embellishments, especially your kids favorite cartoon characters?  While you can find some of these in stickers and even on Cricut cartridges, some are impossible to find.  So why not make your own?   To make this Bob the Builder character I looked online for a printable coloring page (you could also use a page from a coloring book).  


 I then printed the same character on ALL of the different pieces of cardstock. Then it's as simple as cutting and pasting. Start with the bottom layer (for this one I started with the body/peach cardstock) and leave that piece whole using the lines on that piece to keep adding each layer.  You can then use other items (brads, ribbon, etc) to add detail to your cutout.  When you are done you will have your very own custom embellishment! Although this takes a little time it is worth it.


And here is my finished layout.  Zach was so little and I'm really behind on my scrapbooking! 


I hope these tips help you get some stickers out of your stash and get some great custom embellishments on your pages.  Thanks for stopping and have fun scrappin'. 


Supplies:
  • cardstock: scraps
  • patterned paper: ?
  • alphabet stickers: NRN Designs
  • pen: Sakura Gelly Roll Stardust (Clear), black pen
  • misc supplies: screw brads, printable coloring page, black ink

Friday, July 27, 2012

My Little Corner

Besides being busy with the boys and all of their activities, the other main reason I've been bad about posting recently is that my scraproom got a little overhaul! I've wanted to redo my little corner in the basement for awhile and a little drip from a pipe ruined a patch of carpet and the rest is history. So here are a few photos of my 'new' scraproom and some storage ideas too.  Enjoy!!

My little corner of the basement completely empty. 


The new subfloor and paint.


The new floor.


Baseboards!  (I forgot to get a picture after the new outlets were put in.) 


Everything back in my room!!  Man it fills up fast.


My room also has our deep freeze in it.  That's in the far right corner.  My work table is 8' long and hand made by my dad.  It also serves as a half wall to my kids playroom .  (That's their clutter in the bottom left corner.) 


My pegboard for all the tools I use a lot.  Love this thing!!


Storage for paper, adhesive, paper, bling, paper, chipboard, and you guessed it, more paper!
 I got these cubes at Hobby Lobby and Michaels with coupons or on sale.  They are awesome and because there are so many different ones you can organize your space however you wish.  I have them sitting on an old coffee table so they are easier to reach and just in case the basement ever gets any water in it. 


Paper scrap storage. 


I am a keeper of scraps.  I use them all the time.  So to keep my scraps easy to find I organize them by color (ROY G. BIV is my favorite organizational tool) in these handy drawers.  I made the turtles on my Cricut so the colors are easy to see and even my boys can find a scrap if they need to. 


Ribbon storage.


Cricut cutting station.


Yes, I have two Cricuts and believe it or not I do use them both!  I find that each one is better for different things so the more the merrier. 


Button storage.


This is a spice rack that I use for button storage.  I found it on clearance at Target and just took the shaker caps off and it works perfectly!  Plus it twirls! Gotta love that. 


Tim Holtz Distress Ink.


I am slowly building my Tim Holtz Distress Ink collection.  If you know me you know that I love to have it all.  ;-)  My dad made the blending tools and I added the velcro and blending pad.  You can find labels to print with all the Tim Holtz colors here.  And you guessed it,  more organizing with my friend ROY G. BIV.  These are all in a drawer in my tool box.  I love the fact that when my dad upgraded his tool box he thought I might like his old one for storing scrapbook supplies.  He thought right.  It is home to many of my scrapbook items including rubons, brads, glitter, etc. 


Well, that's my 'new' space.  Sorry this was so long.  I hope this gives you some ideas to revamp your scrap space.  I would love to hear your ideas for organizing too.  So if you have a great one leave me a comment.  Thanks for stopping. 

Thursday, July 19, 2012

Happy Birthday Card

It seems like it's been forever since I've posted on here.  Since when did summer break get so busy?!  Anyway, just a quick and simple birthday card for you today.  I came up with this card when I needed one in a pinch and it's so easy to make. 


First, I stamped the Happy Birthday balloon image on white, orange, green, and red cardstock.  I then cut out the balloons from the colored cardstock and glued them to the white stamped image.  Next, I used my American Crafts Knockout Punch to punch a zig-zag border out of the same colors as the balloons.  After layering the borders and attaching them to the card base I added some twine and done!  So take a look through your stamp stash and see what quick and cute cards you can come up with.  Thanks for stopping!

Supplies:
  • cardstock: misc scraps  
  • ink: Memories Dye Inkpad (black)
  • stamp: Stampin' Up
  • tools: American Crafts Knockout Punch (zig-zag)
  • twine: Doodlebug Design, Inc. (Doodle Twine Boy Assortment)
  • pen: Sakura Gelly Roll Stardust (Clear)
  • misc: adhesive