This summer is just flying by! Between camp, swimming lessons, VBS, and life in general we have been busy. That means lots of fun pictures but not lots of time to scrapbook them. That's why I'm excited to be trying a new way to scrapbook and loving it!
I'm hoping to regularly share a PL layout each week on Wednesday and I'm going to start this week by showing you how I am getting everything organized to start working on these layouts and get them done quickly. I know this won't be very exciting but sometimes it's good to see what goes on behind the scene. I'm assuming you already have all the supplies needed (an album, PL core kit, page protectors, and a pen) so I'm leaving out gathering those things. I'm focusing on the photos and how I organize them and put a layout together.
My iPad is a huge help when it comes to organizing my photos. I start by gathering all of the photos I want to use in my camera roll and then put them in folders based on the week they are from. These photos are from both my iPhone and DSLR. I started at the new year even though this album will really start back in July (I'll go back and finish that later). I also worked with only three months of pictures so I wasn't overwhelmed. If you don't have an iPad you could do this in folders on your PC or if your photos are already printed just grab some envelopes and label them with your week on the front and put the photos inside. Here is a screen shot of what my folders look like.

Once your photos are in folders you can then decide which photos to print and what sizes to make them. I'm still perfecting this part of the process and I'm sure will change the way I do this but for now I decided which photos would be full 4x6 and which would be 3x4. To get my 3x4 photos on one 4x6 print I use the PicFrame app. Here is a great explanation on how to get those photos set up. I also use many Instagram photos and this time around printed them in two different sizes because I was not really sure which size would work best. I've used both sizes on my layouts and will probably continue to do so. Here is a peek inside a folder so you can see the large photos and the ones that I used with the PicFrame app.

Once I have figured out all of my sizing I send the photos to print. I typically use Walgreens but this time around I tried out Costco. You could use any photo printing service or print them at home. Once they are printed now it's times to sort them back into physical piles that match the digital folders.
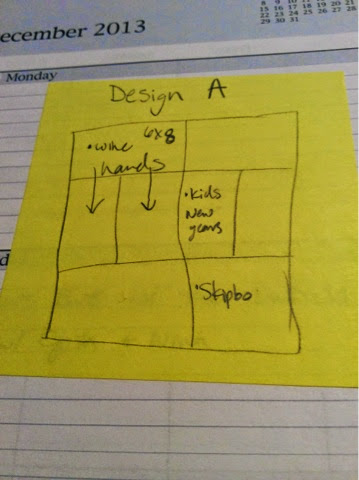
I guess I should back up a bit and explain how I decide which photos to print large and which to make smaller. I grab a pile of post it notes and my journal and decide which PL page protector I'll be using and actually sketch a page to put in the journal. If you search on Pinterest you can find PL planning pages but I feel this works the best for me. I jot down photo placement and use that as a guide to choose sizes and print the photos. From here I put all of the page protectors in my album in order and place all the printed photos in one pocket on each week of the album. These sketches of sorts might not be where the photos end up but it gives me a starting point.
So that's how I work on getting my photos organized and ready to add to my PL album. If you've stayed with me this far kudos to you! I know this is a little wordy and not super exciting. I just wanted you to see my process. Next week I'll share an actual layout. I promise. Until then thanks for stopping!
No comments:
Post a Comment